See the service parts on the opposite page.
Se reporter à la rubrique sur les pièces de rechange sur la page opposée.
Consulte las piezas de repuesto en la página opuesta.
Installation Guide
Guide d’installation
Guía de instalación
Sealant Tape
Ruban d'étanchéité
Cinta selladora
Stainless (Non-Staining) Plumbers Putty
Mastic de plombier non tachant
Masilla de plomería que no manche
Stainless (Non-Staining)
Plumbers Putty
Mastic de plombier non
tachant
Masilla de plomería que
no manche
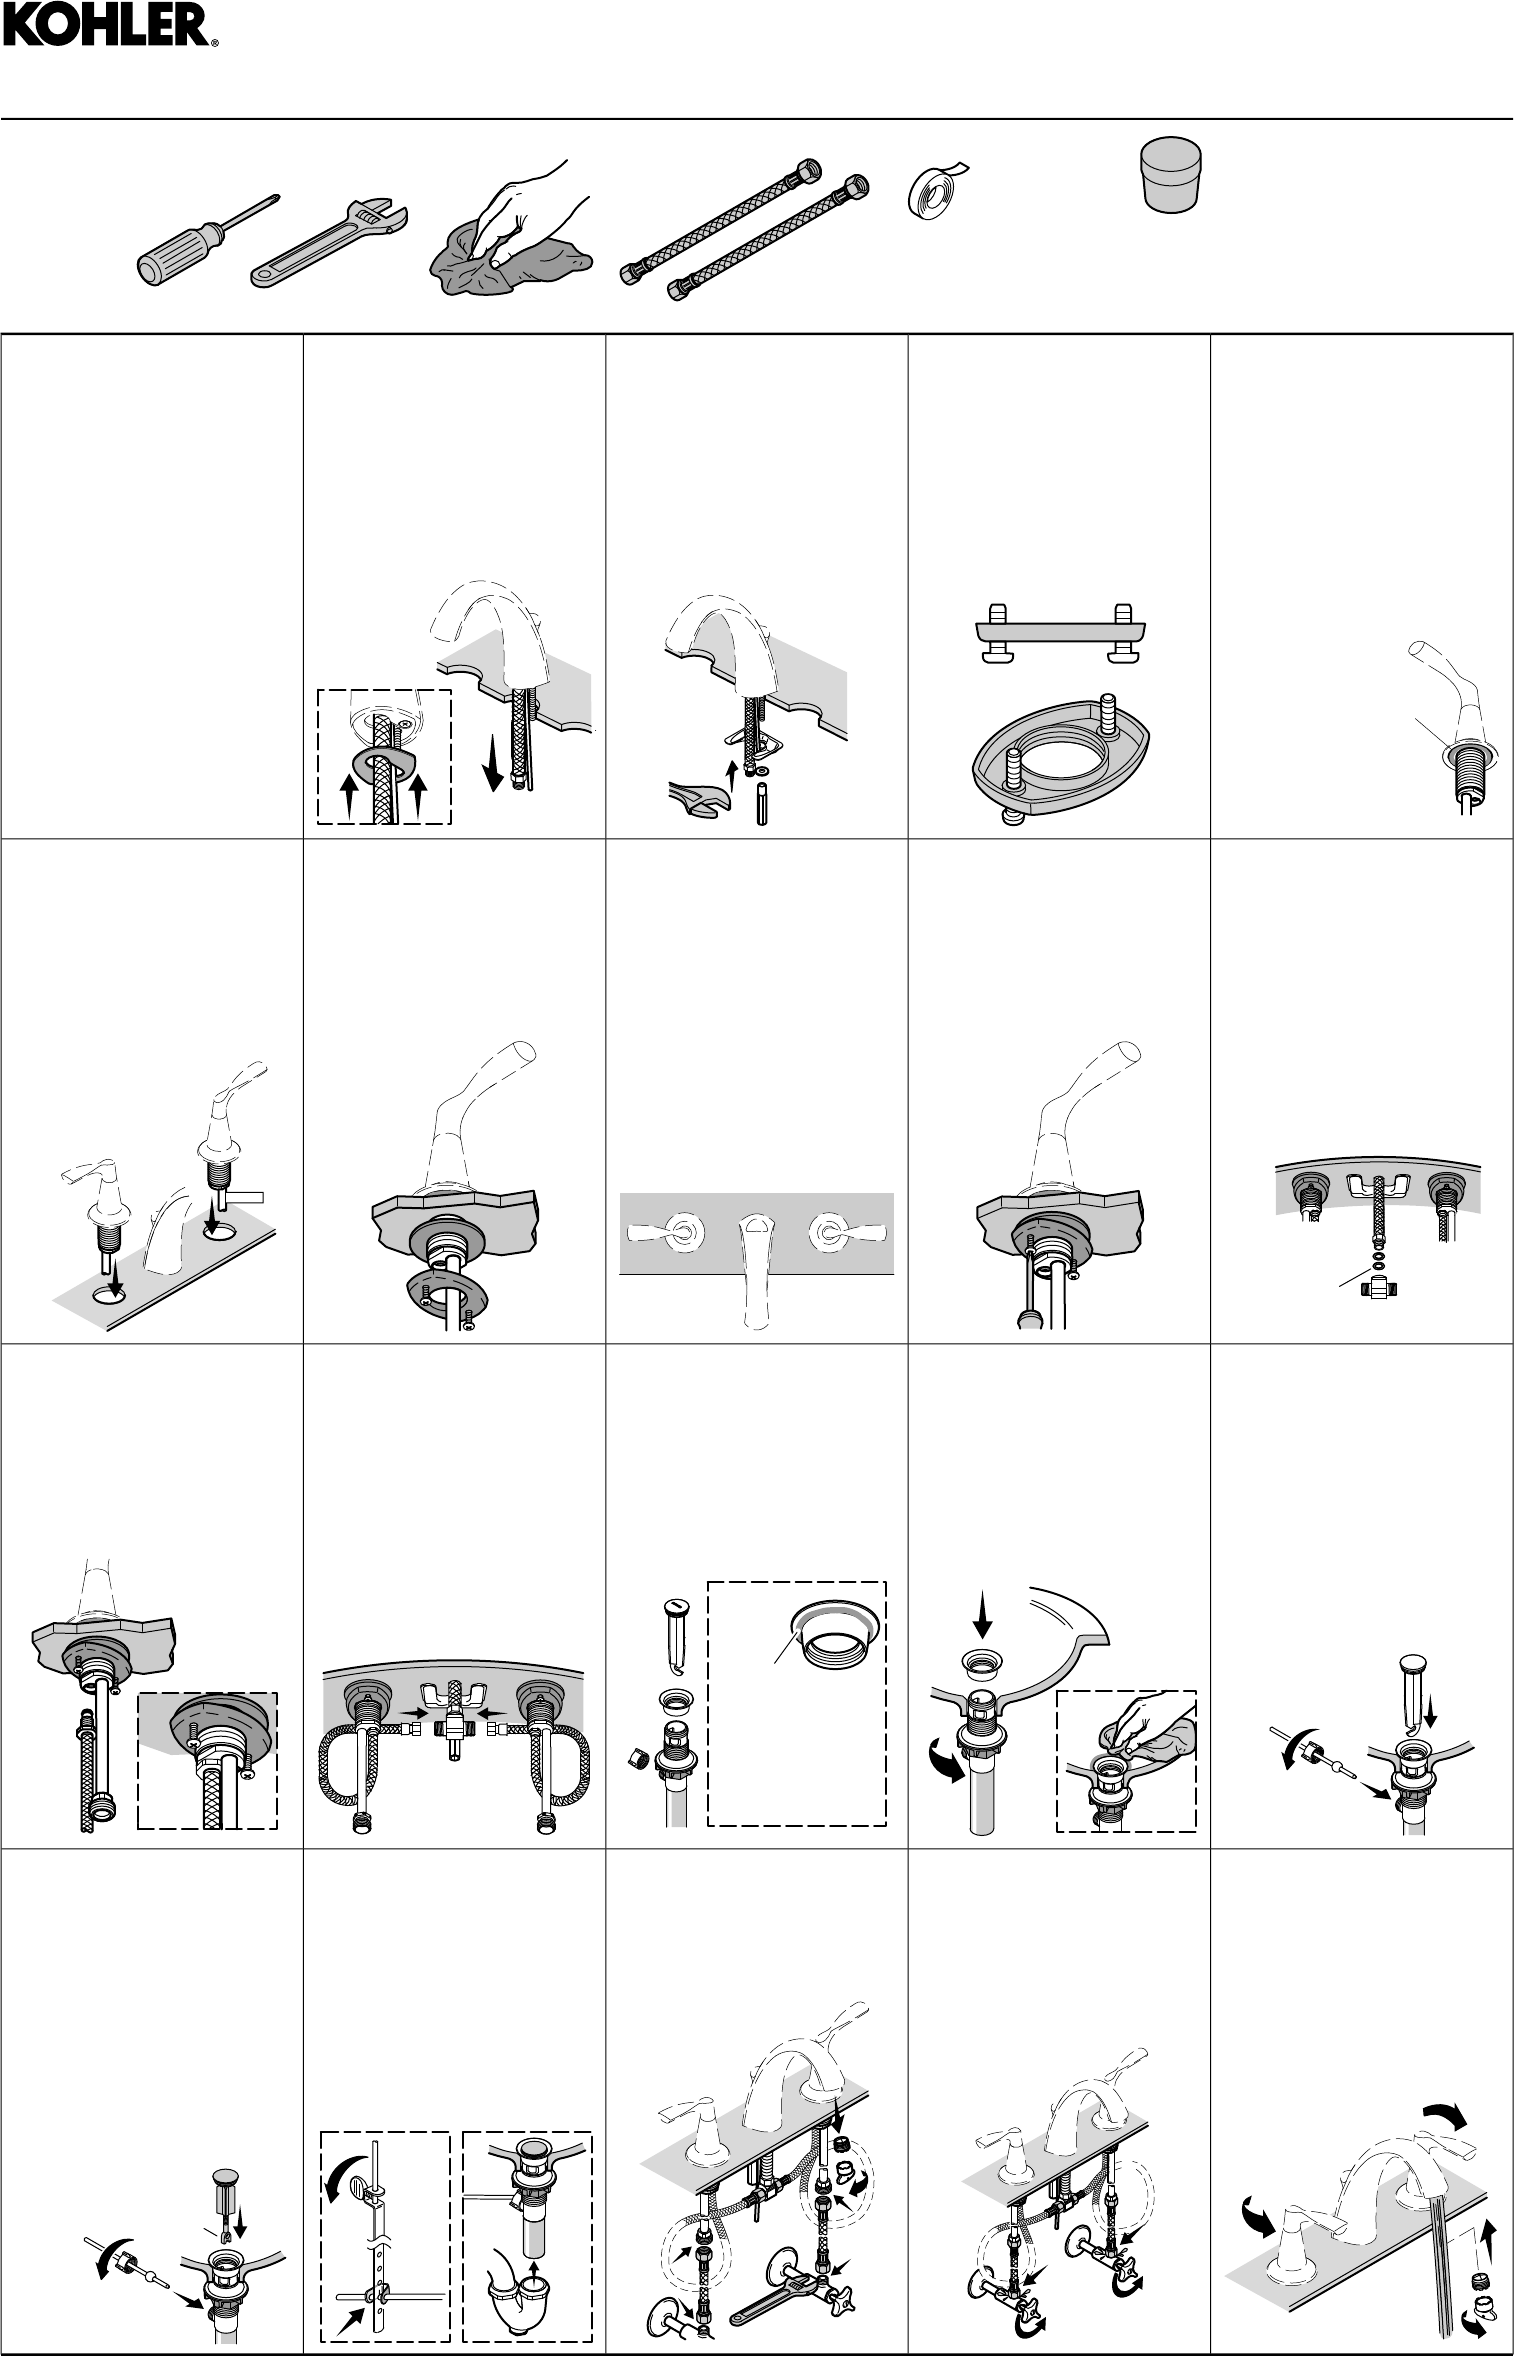
4
Apply plumbers putty to the under-
side of the handles.
Appliquer du mastic de plombier
sur le dessous des poignées.
Aplique masilla de plomería al
lado inferior de las manijas.
3
For all of the rings, partially thread
the screws.
Enfiler les vis partiellement pour
tous les anneaux.
Para todos los anillos, enrosque
parcialmente los tornillos.
2
Slide the bracket and washer onto
the stud. Thread the nut onto the
stud and wrench tighten.
Faire glisser le support et la
rondelle sur le montant. Visser
l'écrou sur le montant et serrer à
la clé.
Deslice el soporte y la arandela
en la varilla roscada. Enrosque la
tuerca en la varilla roscada y
apriete con una llave.
1
Fit the gasket into the underside
of the spout. Insert the spout.
Adapter le joint d'étanchéité dans
le dessous du bec. Insérer le bec.
Coloque el empaque en el lado
inferior del surtidor. Inserte el
surtidor.
Important Information
If possible, assemble the faucet and
drain to the bathroom sink before
installing the sink.
Informations importantes
Si possible, assembler le robinet et
le drain au lavabo avant d'installer
ce dernier.
Información importante
De ser posible, ensamble la grifería
y el desagüe en el lavabo de baño
antes de instalar el lavabo.
Rubber Washer
Rondelle en caoutchouc
Arandela de goma
9
Insert the rubber washer, then the
gasket, into the tee. Tighten and
align the tee toward the valves. Do
not overtighten!
Insérer la rondelle en caoutchouc,
puis le joint d'étanchéité dans le
T. Serrer et aligner le T en
direction des vannes.Ne pas trop
serrer!
Inserte la arandela de goma, luego
el empaque, en la T. Apriete y
alinee la T hacia las válvulas. ¡No
apriete demasiado!
8
Position the screws to the front
and back and tighten to secure.
Placer les vis sur l'avant et l'arrière
et serrer pour fixer en place.
Coloque los tornillos en el frente
y atrás y apriete para fijar.
7
Ensure the handles are in the OFF
position. Align the handles as
shown.
S'assurer que les poignées sont
en position d'arrêt. Aligner les
poignées tel qu'illustré.
Asegúrese de que las manijas
estén en la posición cerrada.
Alinee las manijas como se ilustra.
6
Loosely secure each handle with
a washer and a threaded ring.
Fixer chaque poignée avec une
rondelle et un anneau fileté, sans
serrer.
Fije sin apretar cada manija con
una arandela y un anillo roscado.
COLD
5
Insert the "COLD" handle on the
right and the remaining handle on
the left.
Insérer la poignée "COLD" (Froid)
sur la droite et l'autre poignée sur
la gauche.
Inserte la manija de agua fría
identificada como "COLD" en el
lado derecho y la otra manija en
el lado izquierdo.
14
Type 1: Insert the stopper. Then
insert the rod and tighten the nut.
Type 1: Insérer le bouchon
d'arrêt. Insérer ensuite la tige et
serrer l'écrou.
Tipo 1: Inserte el obturador.
Inserte la varilla y apriete la
tuerca.
13
Install the flange.Tighten the nut.
Wipe away excess plumbers
putty.
Installer la bride. Serrer l'écrou.
Essuyer tout excédent de mastic.
Instale la brida. Apriete la tuerca.
Limpie el exceso de masilla de
plomería.
Stainless
(Non-Staining)
Plumbers Putty
Mastic de plombier
non tachant
Masilla de plomería
que no manche
12
Disassemble the drain. Apply
plumbers putty to the underside
of the flange.
Désassembler le drain. Appliquer
du mastic de plombier sur le
dessous de la bride.
Desensamble el desagüe.
Aplique masilla de plomería al
dorso de la brida.
11
Connect and tighten the hoses.
Do not overtighten!
Connecter et serrer les tuyaux.
Ne pas trop serrer!
Conecte y apriete las
mangueras. ¡No apriete
demasiado!
10
Connect and tighten the hoses.
Do not overtighten!
Connecter et serrer les tuyaux.
Ne pas trop serrer!
Conecte y apriete las
mangueras. ¡No apriete
demasiado!
18
Run the water to flush debris,
then reinstall the aerator.
Laisser couler l'eau pour purger
les débris, puis réinstaller
l'aérateur.
Haga circular agua para eliminar
la suciedad, luego vuelva a
instalar el aireador.
17
Turn on the water supplies.
Check for leaks.
Ouvrir les alimentations d'eau.
Rechercher la présence de
fuites.
Abra los suministros de agua.
Verifique que no haya fugas.
16
Remove the aerator and connect
the water supplies.
Retirer l'aérateur et connecter
les alimentations d'eau.
Retire el aireador y conecte los
suministros de agua.
15
Tighten the thumbscrew. Connect
the lift rod using the clip. Connect
the trap to the tailpiece.
Serrer la vis de serrage.
Connecter la tige de levage en
utilisant le clip. Connecter le
siphon à la pièce de
raccordement.
Apriete el tornillo de mariposa.
Conecte el tirador utilizando el
clip. Conecte la trampa al tubo
final.
Stopper Bolt
Boulon d'arrêt
Perno del obturador
Type 2: Insert the rod and tighten
the nut.Then insert the stopper.Turn
the stopper bolt to adjust the height.
Type 2: Insérer la tige et serrer
l'écrou. Insérer ensuite le bouchon.
Si nécessaire, tourner le boulon du
bouchon pour régler la hauteur.
Tipo 2: Inserte la varilla y apriete la
tuerca. Luego inserte el obturador.
Gire el perno del obturador para
ajustar la altura.
1194332-2-A
 (2 pages)

 (20 pages)
 Manymanuals.com
 Manymanuals.de
 Manymanuals.fr
 Manymanuals.it
 Manymanuals.pl
 Manymanuals.cz
 Manymanuals.es
 Manymanuals-pt.com
Comments to this Manuals