Kohler K-7160-AF-BN Installation Guide
Browse online or download Installation Guide for Unknown Kohler K-7160-AF-BN. KOHLER K-7160-AF-BN Installation Guide User Manual
- Page / 24
- Table of contents
- BOOKMARKS
- 1101880-2-B 1
- 1101880-2-B 2 Kohler Co 2
- Tools/Outils/Herramientas 3
- Antes de comenzar 4
- Kohler Co. 5 1101880-2-B 5
- 1. Install the Drain Ell 6
- 2. Secure the Overflow Ell 7
- Fije el codo del rebosadero 8
- 3. Assemble the Drain 9
- Assembler le drain 10
- Ensamble el desagüe 10
- 4. Tighten the Drain Ell 11
- 5. Adjust the Lift Rod 12
- Ajuster la tige de levage 13
- Ajuste el tirador 13
- 6. Install the Overflow Hood 14
- 7. Adjust the Stopper 15
- 8. Check Lift Rod Operation 16
- Care and Cleaning 17
- Entretien et nettoyage 17
- Cuidado y limpieza 18
- One-Year Limited Warranty 18
- Garantie limitée d’un an 19
- Garantía limitada de un año 19
- 1101880-2-B 20 Kohler Co 20
- Kohler Co. 21 1101880-2-B 21
- 1101880-2-B Kohler Co 22
- Kohler Co. 1101880-2-B 23
Summary of Contents
Installation and Care GuideGuide d’installation et d’entretienGuía de instalación y cuidadoBath DrainsDrains de baignoireDesagües de bañeraM product n
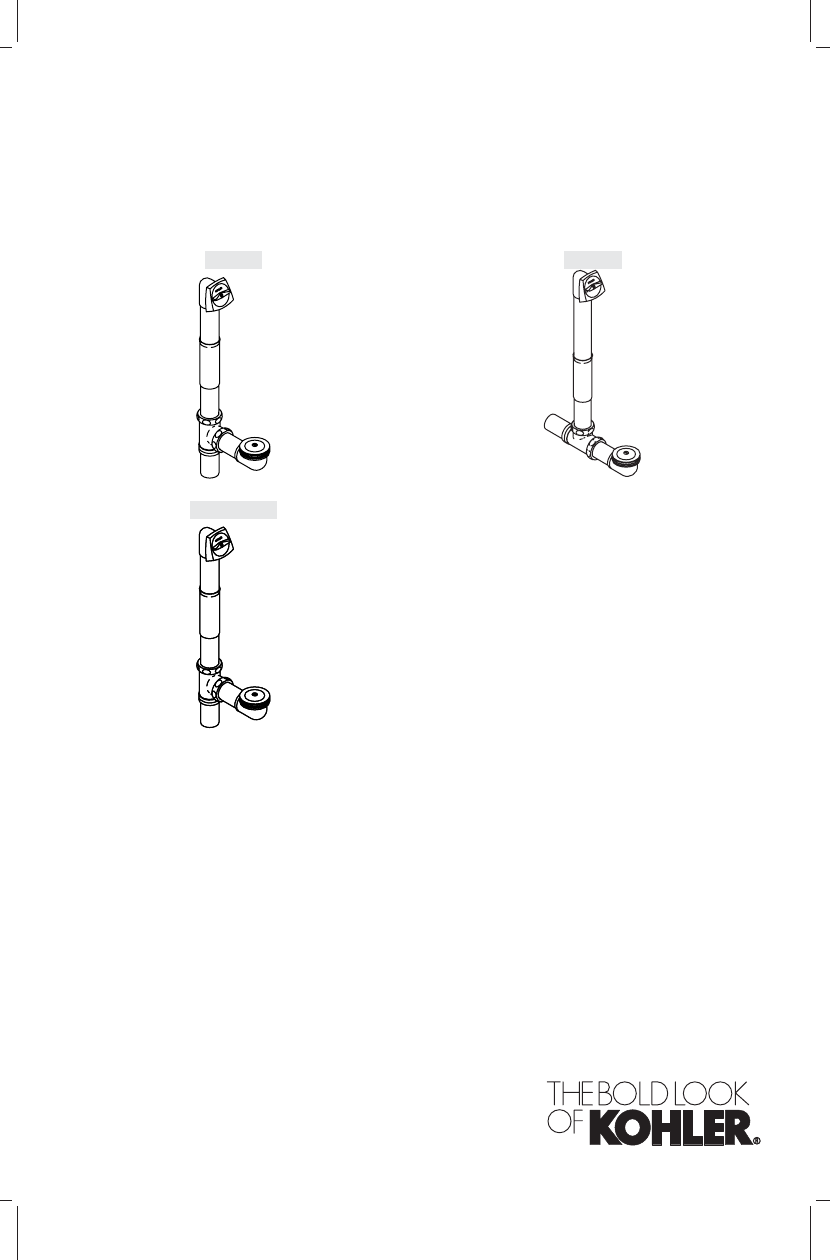
Assembler le drainREMARQUE: Les mêmes étapes s’appliquent aux installations au-dessus et à traversle sol, mais le T est aligné différemment. Se référe
4. Tighten the Drain EllCAUTION: Risk of property damage. To ensure a watertight seal, do notreposition the drain ell after the strainer is tightened.
Apriete el codo de desagüe (cont.)Introduzca los mangos de las pinzas en la parte superior de la coladera paraapretar bien el codo de desagüe.Enrosque
Ajuster la tige de levageEn utilisant un tournevis Phillips, retirer la vis de la poignée. Retirer la poignéedu couvercle du trop-plein.Avec les arrêt
6. Install the Overflow HoodWrap thread sealant tape around the threads of the two Phillips screws provided.This will prevent water weeping through the
7. Adjust the StopperTurn the handle counterclockwise. The distance between the underside of thedrain stopper and the bath surface should be 3/8″ (1 c
Ajuste el obturadorGire la manija hacia la izquierda. La distancia entre el lado inferior del obturadordel desagüe y la superficie de la bañera debe se
Vérifier l’opération de la tige de levageREMARQUE: Si un dégagement suffisant ne peut pas être obtenu en ajustant l’arrêt,effectuer la procédure suivan
Entretien et nettoyage (cont.)•Ne pas laisser les nettoyants sur les surfaces.•Utiliser une éponge ou un chiffon doux et humide. Ne jamais utiliser de
Garantie limitée d’un anLes produits de plomberie KOHLER sont garantis contre tout défaut matériel et defabrication pour un an, à partir de la date de
Thank You For Choosing Kohler CompanyThank you for choosing Kohler Company. Your Kohler Company product reflects thetrue passion for design, craftsmans
Service Parts/Pièces de rechange/Piezas de repuestoBA1009708(K-7166-AF, K-7166M-AF)11046178927965879526671009706 (K-7160-TF, K-7160M-TF)1009699(K-7160
Service Parts/Pièces de rechange/Piezas de repuesto (cont.)527031007554(K-7166-AF, K-7166M-AF)2964329599**Finish/color code must be specified when ord
1101880-2-B Kohler Co.
Kohler Co. 1101880-2-B
1101880-2-B
Tools/Outils/HerramientasBefore You BeginObserve all local plumbing and building codes.Turn off the main water supplies.Carefully inspect the fittings
Avant de commencer (cont.)Kohler Co. se réserve le droit d’apporter toutes modifications au design des drainset ceci sans préavis, comme spécifié dans l
Roughing-In/Plan de raccordement/Diagrama de instalación3"(7.6 cm)2-7/8"(7.3 cm)K-7166-AF1-1/2" ODØ Ext.D.E.1-1/2" NPT1-1/2"
1. Install the Drain EllNOTE: Remove any burrs that may exist on the bath drain outlet.Extract the stopper from the strainer.Disassemble the strainer
Instale el codo de desagüeNOTA: Retire las rebabas que puedan existir en la salida del desagüe de la bañera.Extraiga el obturador de la coladera.Desen
Secure the Overflow Ell (cont.)Thread screws into overflow ell approximately three to four turns. Do not tightenthe screws completely. The overflow ell m
3. Assemble the DrainNOTE: The same steps apply to both the through-the-floor and above-the-floorinstallations, but the tee is aligned differently. Refe
Related products and manuals for Unknown Kohler K-7160-AF-BN


 (12 pages)
(28 pages)
(16 pages)
(24 pages)
(16 pages)
(20 pages)
(44 pages)
(12 pages)
(28 pages)
(16 pages)
(24 pages)
(16 pages)
(20 pages)
(44 pages)
 (4 pages) (52 pages)
© 2020, manymanuals.com. All rights reserved. | 1.474 s |
 Manymanuals.com
 Manymanuals.de
 Manymanuals.fr
 Manymanuals.it
 Manymanuals.pl
 Manymanuals.cz
 Manymanuals.es
 Manymanuals-pt.com
Comments to this Manuals